I wanted to make this post as a reminder of the steps I took to setup my raspberry pi.
if you don't know what is Raspberry Pi, just head to http://www.raspberrypi.org/.
I recommend using the Raspbian "Wheezy" as a starting point.
Raspberry pi download page: http://www.raspberrypi.org/downloads
Once you get the distro file "img" you need a little program to load it into a SD card, there are many out there but I like to use: win32disk imager
You can download it from: http://sourceforge.net/projects/win32diskimager/
you can do this by running this command:

once SSH is enabled, you can login to your pi remotely using Putty or any other Telnet/SSH client
Other useful command I like to run the first time I boot up onto my pi is:
First install Tight Vnc Serve by running this command.
There is also a way to fire up Tight Vnc Server every time the pi boots, head to the link below for more details.
Source: http://www.howtogeek.com/141157/how-to-configure-your-raspberry-pi-for-remote-shell-desktop-and-file-transfer/all/
if you don't know what is Raspberry Pi, just head to http://www.raspberrypi.org/.
---- Installing the Linux Distro ----
Lets begin with the very basic, downloading and installing a Linux distro into our piI recommend using the Raspbian "Wheezy" as a starting point.
Raspberry pi download page: http://www.raspberrypi.org/downloads
Once you get the distro file "img" you need a little program to load it into a SD card, there are many out there but I like to use: win32disk imager
You can download it from: http://sourceforge.net/projects/win32diskimager/
---- First Commands ----
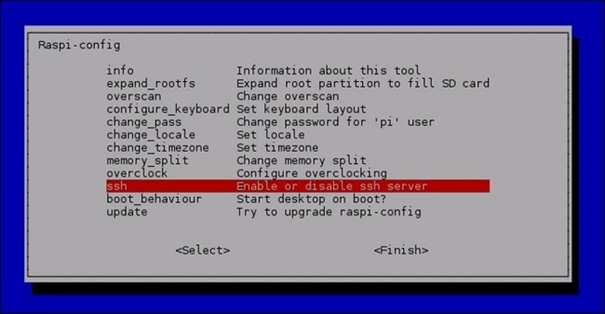
The first thing I like to do is enable SSHyou can do this by running this command:
sudo raspi-configand enable ssh as shown in the next figure.
once SSH is enabled, you can login to your pi remotely using Putty or any other Telnet/SSH client
Other useful command I like to run the first time I boot up onto my pi is:
this will ensure that I have all the packages up to date.
sudo apt-get updatesudo apt-get upgrade
---- Installing a Graphical Remote Desktop Connection ----
From time to time I like to use a graphical interface to do some task. One way of doing this is using a Remote Desktop Connection.First install Tight Vnc Serve by running this command.
sudo apt-get install tightvncserverafter installing the Tight Vnc Server, you can run it manually every time you need it (using ssh) with this command
vncserver :1 -geometry 1600×900 -depth 16 -pixelformat rgb565:and after you have finished using it, run
vncserver –kill :1to kill the server and stop using any resources.
There is also a way to fire up Tight Vnc Server every time the pi boots, head to the link below for more details.
Source: http://www.howtogeek.com/141157/how-to-configure-your-raspberry-pi-for-remote-shell-desktop-and-file-transfer/all/
---- Installing Git ----
Git is a great service for cloud source control, you can install it in you pi running the following command.
sudo apt-get install git
---- Installing GPIO Drivers ----
If you want to use the gpios you have in your pi, you will need to install the gpio drivers.
sudo apt-get install python-devsudo apt-get install python-rpi.gpio
---- Enable SPI and I2C module ----
edit file: sudo nano /etc/modules
verify this lines are in the file
snd-bcm2835
i2c-bcm2708
i2c-dev
On the file:
sudo nano /etc/modprobe.d/raspi-blacklist.conf
Comment out
#blacklist spi-bcm2708
#blacklist i2c-bcm2708
to enable both modules
---- Install SPI Drivers ----
git clone git://github.com/doceme/py-spidev
install py-spidev by navigating to /py-spidev folder and
sudo python setup.py install
---- Install Uart Drivers ----
sudo apt-get install python-serial
Broadcom peripherals datasheet:
---- Utilities ----
RPi Monitor
Backup your SD card
WebIDE
installation
issue
---- Some Useful Drivers ----
Some raspberry pi python drivers
RPi.GPIO documentation
RPi peripherals